ansible-builderとansible-navigatorをちょっとだけ触る。
はじめに
取り合えずlocalhostでdebugモジュールを動かすだけのPlaybookを流すまで。なるべくシンプルに。
WSL2 Ubuntu-20.04上で実施。podman導入済み。EEのバージョンは下記。
$ podman --version
podman version 3.3.1
$ ansible-builder --version
1.0.1
$ ansible-navigator --version
ansible-navigator 1.1.0
$ ansible-runner --version
2.0.3
ansible-builder
主に下記を参考。
↓でも可。正直、↑の方が取っつきやすかった。
https://ansible-builder.readthedocs.io/en/stable/index.html
pip install ansible-builder
cat << EOF > execution-environment.yml
---
version: 1
dependencies:
  galaxy: requirements.yml
EOF
cat << EOF > requirements.yml
---
collections:
  - name: awx.awx
EOF
ansible-builder build --tag=general -v 3
collectionsは形だけ指定。- 数分かかるので、進捗気になる人は
-v推奨。 ansible-builder build実行に伴って、dangling image(<none>:<none>)が作成される。- 不要であれば
podman image prune等で削除しても良いが、イメージの微調整が想定される場合は、残しておいた方が良いかも?
- 不要であれば
ansible-navigator
pip install ansible-navigator
ansible-runnerも一緒にインストールされる。
sudo mkdir /dev/mqueue
cat << EOF > ~/.ansible-navigator.yml
---
ansible-navigator:
  execution-environment:
    image: general
    pull-policy: never
EOF
ansible-navigator -m stdout run playbook.yml -i inventory.ini
下記、実行結果。
$ ansible-navigator -m stdout run playbook.yml -i inventory.ini

PLAY [localhost] ***************************************************************

TASK [debug] *******************************************************************
ok: [localhost] => {
    "msg": "Hello world!"
}

PLAY RECAP *********************************************************************
localhost                  : ok=1    changed=0    unreachable=0    failed=0    skipped=0    rescued=0    ignored=0
- 下記が出力される場合は、WSL Ubuntuで
/dev/mqueueの作成漏れ。
Error: statfs /dev/mqueue: no such file or directory
以上。
ansible.utils.fact_diff モジュールで特定行を無視する。
はじめに
Ansibleでdiffするansible.utils.fact_diffモジュールに、skip_linesという特定行をスキップするためのパラメータがあります。使い方は下記ドキュメントに記載の通りなのですが、ぱっと見わかりづらかったのと、Examplesにサンプルコードがなかったので、自分用のメモに。
Playbook
---
- hosts: localhost
  gather_facts: false
  connection: local
  vars:
    before:
      - google
      - apple
      - facebook
      - amazon
    after:
      - google
      - apple
      - meta
      - amazon
      - '*kigou* to space!'
  tasks:
    - name: diff
      ansible.utils.fact_diff:
        before: "{{ before }}"
        after: "{{ after }}"

    - name: diff skipping the lines
      ansible.utils.fact_diff:
        before: "{{ before }}"
        after: "{{ after }}"
        plugin:
          vars:
            skip_lines:
              - facebook
              - ^m\S.+a$
              - \*kigou\* to space\!
実行結果
PLAY [localhost] *************************************************************************************************************************************************

TASK [diff] ******************************************************************************************************************************************************
--- before
+++ after
@@ -1,4 +1,5 @@
 google
 apple
-facebook
+meta
 amazon
+*kigou* to space!

changed: [localhost]

TASK [diff skipping the lines] ***********************************************************************************************************************************
ok: [localhost]

PLAY RECAP *******************************************************************************************************************************************************
localhost                  : ok=2    changed=1    unreachable=0    failed=0    skipped=0    rescued=0    ignored=0
以上。
PodmanをWSL2で動かす
はじめに
これまでDocker Desktop for Windowsを使っていたのですが、Linuxでコンテナをホストしたくなったので。環境は下記。
> wsl -l -v
  NAME            STATE           VERSION
* Ubuntu-20.04    Running         2
インストール
ほぼ下記ページの記載通り。
. /etc/os-release
sudo sh -c "echo 'deb http://download.opensuse.org/repositories/devel:/kubic:/libcontainers:/stable/x${NAME}_${VERSION_ID}/ /' > /etc/apt/sources.list.d/devel:kubic:libcontainers:stable.list"
wget -nv https://download.opensuse.org/repositories/devel:kubic:libcontainers:stable/x${NAME}_${VERSION_ID}/Release.key -O Release.key
sudo apt-key add - < Release.key
sudo apt-get update -qq
sudo apt-get -qq -y install podman
sudo mkdir -p /etc/containers
echo -e "[registries.search]\nregistries = ['docker.io', 'quay.io']" | sudo tee /etc/containers/registries.conf
インストール完了。
$ podman -v
podman version 3.3.1
WSL2固有の設定(ルートレス)
参考にした「Enable Sysadmin」の記事では、podman infoを実行すると、$HOME/.config/containers/libpod.confが作成されるとありますが、私の環境では作成されませんでした。
ということで、普通に手動作成。
mkdir -p $HOME/.config/containers/
touch $HOME/.config/containers/libpod.conf
作成したlibpod.confに下記を記述。
[engine]
events_logger="file"
ひな形は/usr/share/containers/containers.confを参照。
動作確認
https://hub.docker.com/_/hello-worldでハロワ。
$ podman run docker.io/hello-world
Trying to pull docker.io/library/hello-world:latest...
Getting image source signatures
Copying blob 2db29710123e done
Copying config feb5d9fea6 done
Writing manifest to image destination
Storing signatures

Hello from Docker!
This message shows that your installation appears to be working correctly.

To generate this message, Docker took the following steps:
 1. The Docker client contacted the Docker daemon.
 2. The Docker daemon pulled the "hello-world" image from the Docker Hub.
    (amd64)
 3. The Docker daemon created a new container from that image which runs the
    executable that produces the output you are currently reading.
 4. The Docker daemon streamed that output to the Docker client, which sent it
    to your terminal.

To try something more ambitious, you can run an Ubuntu container with:
 $ docker run -it ubuntu bash

Share images, automate workflows, and more with a free Docker ID:
 https://hub.docker.com/

For more examples and ideas, visit:
 https://docs.docker.com/get-started/
以上。
Guacamoleからxrdpでubuntuで繋いだ時のキーボードのキーマップがおかしい
はじめに
環境は下記。
- Ubuntu Desktop 20.04.2 LTS
- Guacamole 1.3.0
- xrdp 0.9.12
Guacamoleの雰囲気を見たかっただけのため、GuacamoleはコンテナとしてUbuntu上にデプロイ。
事象
GuacamoleからUbuntuにRDP接続し、入力ソースで"ja"を指定した場合、キーボードレイアウトは日本語キーボードになるものの、キーマップが期待通りでない。
具体的には、下記のようになる。
| 入力したキー | 出力される文字 |
|---|---|
| " | * |
| * | ( |
| ( | ) |
| ) | ~ |
| ~ | 何も表示されない |
英字キーボードとして認識されているわけでもなく、見たことのないキーマップ。
対処方法
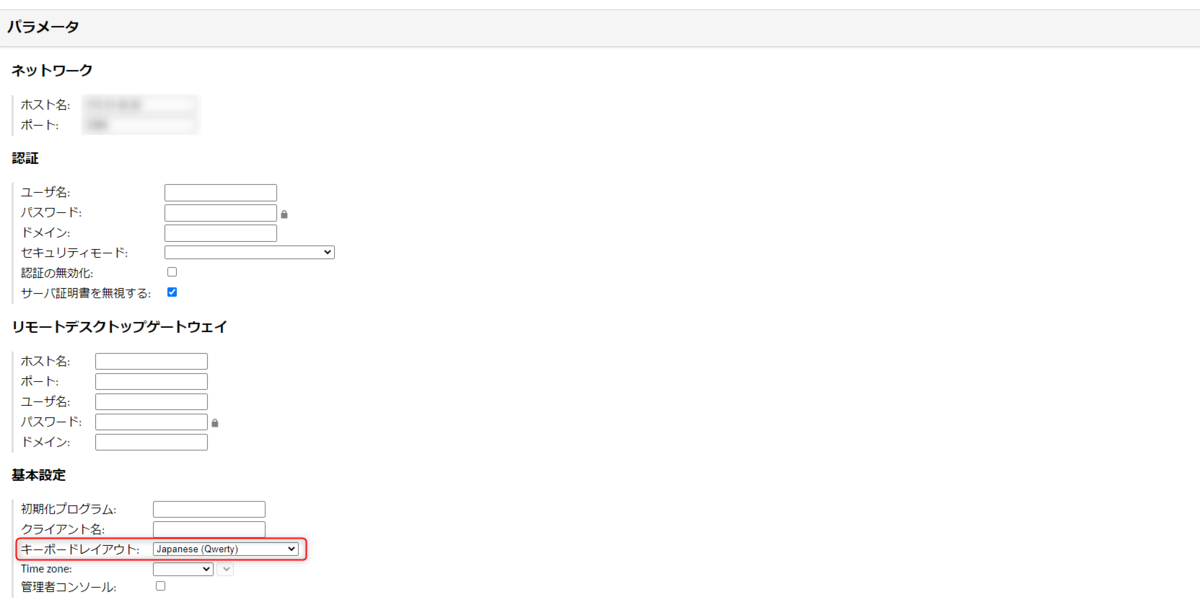
Guacamoleの設定画面から、対象の接続プロパティの編集画面に遷移し、[パラメータ]-[基本設定]-[キーボードレイアウト]でJapanese(Qwerty)を選択してから、再接続することで、期待通りの文字が出力されることを確認。
対処前のキーマップが一体何者なのかはわかりませんが、復旧したので一旦これで…。
Playbook が「ジョブテンプレート」のドロップダウンリストに表示されない

原因
Playbookにシンタックスエラーがあったため。ansible-playbook --syntax-checkは忘れずやっておきましょうという自戒。
環境
Tower 3.7.3
事象
タイトルの通りです。もう少し詳しく状況を書くと、
- プロジェクトのSCMはGitLab。
- プロジェクトの更新は正常終了。
- 認証周りに問題なし。
/var/lib/awx/配下にファイルの実体を確認- 正しくcloneできていて、パーミッションも問題なし。
調査&原因判明
正直、上記の状況を確認した時点で手詰まり感ありましたが、めげずに管理者ガイドのトラブルシューティングを確認すると、下記の記載(発生環境は3.7.3ですが、該当バージョンの日本語マニュアルがなかったので、下記ドキュメントは3.7.2のものを記載しています)。
Playbook が有効な YML で、Ansible で解析できることを確認してください。
VScodeからYAMLのシンタックスエラーは出ていないことを確認していましたが、念のためansible-playbook --syntax-checkしてみると…。
ERROR! 'host' is not a valid attribute for a Play
hostsディレクティブをhostと書き間違えていたため、エラー。まさかこんなことで…と思いつつ、修正&再push&SCM更新したところ、復旧し、ドロップダウンリストに出てくるようになりました。
特定のタスクを1号機だけ実行する
はじめに
下記のようなインベントリがあったとします。
[servers]
node01
node02
node01、node02が、ほぼ同じ構成のとき、基本的にはserversグループを対象としてPlaybookを作成すると思います。
しかし、何らかの事情で、あるタスクは1号機だけ実行したいというケースがあった場合、ホスト名のサフィックスを利用して、これを実現する例を書いてみます。
Playbook
- hosts: servers
  gather_facts: false
  tasks:
    - name: all node
      ansible.builtin.debug:
        msg: "I am {{ inventory_hostname }}"

    - name: only primary
      ansible.builtin.debug:
        msg: "I am {{ inventory_hostname }}"
      when: inventory_hostname | regex_search('.+01$')
実行結果
PLAY [servers] ******************************************************************************************************

TASK [all node] *****************************************************************************************************
ok: [node01] => {
    "msg": "I am node01"
}
ok: [node02] => {
    "msg": "I am node02"
}

TASK [only primary] *************************************************************************************************
ok: [node01] => {
    "msg": "I am node01"
}
skipping: [node02]

PLAY RECAP **********************************************************************************************************
node01                     : ok=2    changed=0    unreachable=0    failed=0    skipped=0    rescued=0    ignored=0
node02                     : ok=1    changed=0    unreachable=0    failed=0    skipped=1    rescued=0    ignored=0